Object detection by Pytorch SSD MobileNet Part(2)

colaboratory

Introduction

Hello, this is swim-lover. I’m trying object detection by Pytourch. I’ve just started Python, and I’m studying with the concept of “learning while using”. Last time, as an object detection by Pytorch, I ran object detection (SSD) in the Google Colab environment. This time, I would like to perform object detection using an implementation sample called MobileNet.

Downloading Object Detection (SSD) Execution Environment

This time, I will try an implementation sample called MobileNet. It is an implementation that works on mobile terminals.

Files downloaded in the Colab environment will disappear after a certain period of time. It seems that the cause is that the Colab environment is reset, but it is hard to start over from the beginning because the downloaded files, packages, training data, etc. disappear.

Therefore, if you mount My Drive of Google Drive in the Colab environment and handle the file on My Driver, the problem of disappearing will disappear.

First, execute the following command in the colab environment. At this time, a confirmation screen for access permission will appear, so allow it.

from google.colab import drive
drive.mount('/content/drive')

Let’s check if the mount was successful.

cd drive
ls

I was able to confirm that MyDrive was mounted.

MyDrive/  Othercomputers/

I would like to create a folder called pytorch-ssd-test and proceed with the confirmation here.

mkdir pytorch-ssd-test
cd pytorch-ssd-test/

Next, download the SSD execution sample with the following git command. In the colab environment, it seems that you need to put an exclamation mark (“!”) before the Linux command.

However, the commands mentioned above (pwd, ls, cd, etc.) could be executed without adding them. You may be able to execute frequently used commands without adding them. (This content may be corrected at a later date.)

!git clone https://github.com/qfgaohao/pytorch-ssd.git
Cloning into 'pytorch-ssd'...
remote: Enumerating objects: 812, done.
remote: Total 812 (delta 0), reused 0 (delta 0), pack-reused 812
Receiving objects: 100% (812/812), 1.05 MiB | 359.00 KiB/s, done.
Resolving deltas: 100% (544/544), done

Let’s check if the download is successful.

cd pytorch-ssd
ls

I was able to confirm that it was downloaded properly.

convert_to_caffe2_models.py  README.md
draw_eval_results.py         readme_ssd_example.jpg
eval_ssd.py                  run_ssd_example.py
extract_tf_weights.py        run_ssd_live_caffe2.py
gun.jpg                      run_ssd_live_demo.py
LICENSE                      train_ssd.py
models/                      translate_tf_mobilenetv1.py
open_images_downloader.py    vision/
prune_alexnet.py             visual_tf_models.py

Check the README file

Check the README file included in the downloaded file.

less README.md

When you enter the less command, a help screen appears in your browser and you can see the contents of the README. It is quite excellent.

This time, I would like to run Mobilenet V1 SSD.

Downloading trained model

Only the execution script was downloaded by the above git command. Download the trained model there. (The contents of the models are still empty.)

Download the trained model and label with the following command. Execute the command with an exclamation mark at the beginning.

・The trained model tata

!wget -P models https://storage.googleapis.com/models-hao/mobilenet-v1-ssd-mp-0_675.pth

・The label data

!wget -P models https://storage.googleapis.com/models-hao/voc-model-labels.txt

Run the sample

Place the image you want to identify in the pytorch_ssd folder. This time I tried using the image of the bicycle.

Run the sample script “run_ssd_example.py”.

!python3 run_ssd_example.py mb1-ssd models/mobilenet-v1-ssd-mp-0_675.pth models/voc-model-labels.txt sample.jpg

“Run_ssd_example_output.jpg” was output as an output file.

Inference time:  0.32605862617492676
Found 1 objects. The output image is run_ssd_example_output.jpg

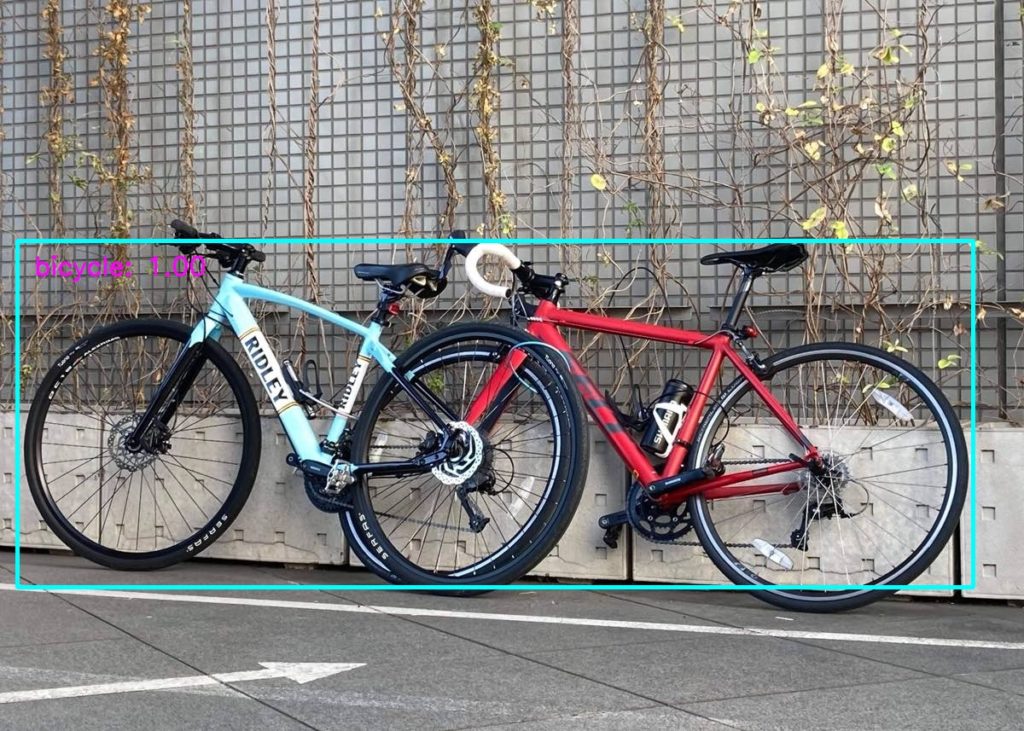
This trained model was aware of the bicycle. However, This model recognized two bicycles as one. It may have been a little difficult image.

Try another image.

This time, This model was able to recognize four bicycles.

Conclusion

This time, I tried object recognition using Mobile Net, which is an implementation sample of object detection (SSD) with Pytorch. I would like to continue object recognition from the next time onwards.

Pytorchによる物体検出 SSD MobileNet Part(2)

colaboratory

はじめに

こんにちわ、swim-loverです。PythonとPytorchで物体検出を行っています。 Pythonを始めたばかりですが、「使いながら覚える」をコンセプトに勉強しています。 前回、Pytorchによる物体検出として、Google Colab環境で物体検出(SSD)を動かしました。今回は、MobileNetという実装サンプルを使って物体検出を行いたいと思います。

物体検出 SSD 実行環境のダウンロード

今回は、MobileNetという実装サンプルを試してみます。モバイル端末でも動作するような実装とのことです。

Colab環境でダウンロードしたファイルなどは、一定の時間が経過すると消えてしまいます。Colab環境がリセットされてしまうことが原因のようですが、ダウントードしたファイル、パッケージ、学習データなどが消えて、最初からやり直しとなると大変です。

そこで、Google DriveのMy DriveをColab環境にマウントして、My Driver上で、ファイルを扱えば消えてしまう問題はなくなります。

まず、colab環境で以下のコマンドを実行します。この際、アクセス許可の確認画面が出てきますので許可をします。

from google.colab import drive
drive.mount('/content/drive')

マウントに成功したかどうか早速、確認してみます。

cd drive
ls

MyDriveがマウントされてることが確認できました。

MyDrive/  Othercomputers/

pytorch-ssd-testというフォルダを作成し、ここで確認を進めたいと思います。

mkdir pytorch-ssd-test
cd pytorch-ssd-test/

次に、以下のgitコマンドにより、SSDの実行サンプルをダウンロードします。なお、colab環境では、Linuxコマンドの前に、エクスクラメーションマーク(“!”)を付ける必要があるようです。

しかし、上に出てきたコマンド(pwd,ls,cdなど)では、つけなくても実行できました。多用するコマンドは、つけなくても実行できるのかもしれません。(この内容は、後日訂正する可能性があります。

!git clone https://github.com/qfgaohao/pytorch-ssd.git
Cloning into 'pytorch-ssd'...
remote: Enumerating objects: 812, done.
remote: Total 812 (delta 0), reused 0 (delta 0), pack-reused 812
Receiving objects: 100% (812/812), 1.05 MiB | 359.00 KiB/s, done.
Resolving deltas: 100% (544/544), done

問題なくダウンロードできているか確認してみます。

cd pytorch-ssd
ls

ちゃんとダウンロードできていることが確認できました。

convert_to_caffe2_models.py  README.md
draw_eval_results.py         readme_ssd_example.jpg
eval_ssd.py                  run_ssd_example.py
extract_tf_weights.py        run_ssd_live_caffe2.py
gun.jpg                      run_ssd_live_demo.py
LICENSE                      train_ssd.py
models/                      translate_tf_mobilenetv1.py
open_images_downloader.py    vision/
prune_alexnet.py             visual_tf_models.py

READMEの確認

ダウンロードしたファイルに含まれているREADMEファイルを確認してみます。

less README.md

lessコマンドを入力すると、ブラウザにヘルプ画面が現れ、READMEの中身が見れるようになりました。なかなか優秀な作りです。

今回は、MobilenetV1 SSDを動かしてみたいと思います。

学習モデルのダウンロード

上のgitコマンドでダウンロードしたのは、実行スクリプトのみです。そこで学習モデルをダウンロードします。(modelsの中身はまだ空になっています。)

以下のコマンドで、学習済みモデルとラベルをダウンロードします。コマンドの先頭にエクスクラメーションマークをつけて実行します。

・学習済みモデルデータ

!wget -P models https://storage.googleapis.com/models-hao/mobilenet-v1-ssd-mp-0_675.pth

・ラベルデータ

!wget -P models https://storage.googleapis.com/models-hao/voc-model-labels.txt

サンプルの実行

識別したい画像をpytorch_ssdフォルダに置きます。今回は自転車の画像を使用してみました。

サンプルのスクリプト “run_ssd_example.py”を実行します。

!python3 run_ssd_example.py mb1-ssd models/mobilenet-v1-ssd-mp-0_675.pth models/voc-model-labels.txt sample.jpg

出力ファイルとして、”run_ssd_example_output.jpg”が出力されました。

Inference time:  0.32605862617492676
Found 1 objects. The output image is run_ssd_example_output.jpg

自転車を認識しています。しかし、2台分の自転車を1台分として認識しています。少し難しい画像だったのかもしれません。
別の画像を試してみます。

今回は、4台分の自転車を認識できました。

まとめ

今回、Pytorchで物体検出(SSD)の実装サンプルであるMobile Netを使って、物体認識を行ってみました。次回以降も物体認識をしてみたいと思います。

コメント

タイトルとURLをコピーしました